Build a wizard in React with react-hook-form (with validation)
Introduction
In this post I’ll show you how I build a multi step dialog, also known as a wizard. It fulfills the following requirements:
- Embedded into another page
- Allows for navigation between the steps
- No data is lost when the user navigates between the steps
- Validates the input on the client and server
The complete project can be found on GitHub.
This tutorial is not a step-by-step guide on how to setup a React project and add a wizard. I will only point out the relevant parts assuming you are comfortable reading someone else’s code. I hope the comments you’ll find in the code will help you.
I highly recommend Gitpod to dig into the code. They have a free tier which allows you to open the repository and have a full VS Code editor in the browser. All the setup and dependency installation is taken care of automatically.
Just open the project in Gitpod, wait till it started and navigate to http://localhost:3000.
The Wizard
The wizard will have three steps. Two to enter data and one to review the data and submit it to the server.
The user will be able to freely navigate between the different steps without losing any data. Each step validates its fields and the final step validates all data.
The validation will happen on the client and server side. Simple validation is done on the client side (i.e. that an input is filled) while the server side allows for more extensive validation.
To achieve this we will use the following libraries:
- React
- react-hook-form
Makes working with forms easier. - react-router
Routing for the form and the app itself. - zustand
To manage the state of the wizard across different steps. - TailwindCSS
To make it look pretty.
Overview
The example app we are looking at is used to manage employees. It shows a list of existing employees and new employees can be added.
This is where the wizard is used. Each employee has four fields that need to be filled.
The first step of the wizard has inputs for the name and email of the employee, while the second step asks for the title and role. The final step shows a summary of the data entered in the previous two steps and creates the employee.
The implementation consists out of three key parts:
- Embedding the wizard into an existing page
- Setting up the wizard itself and its steps
- Managing the state across all steps
The result will look like this:
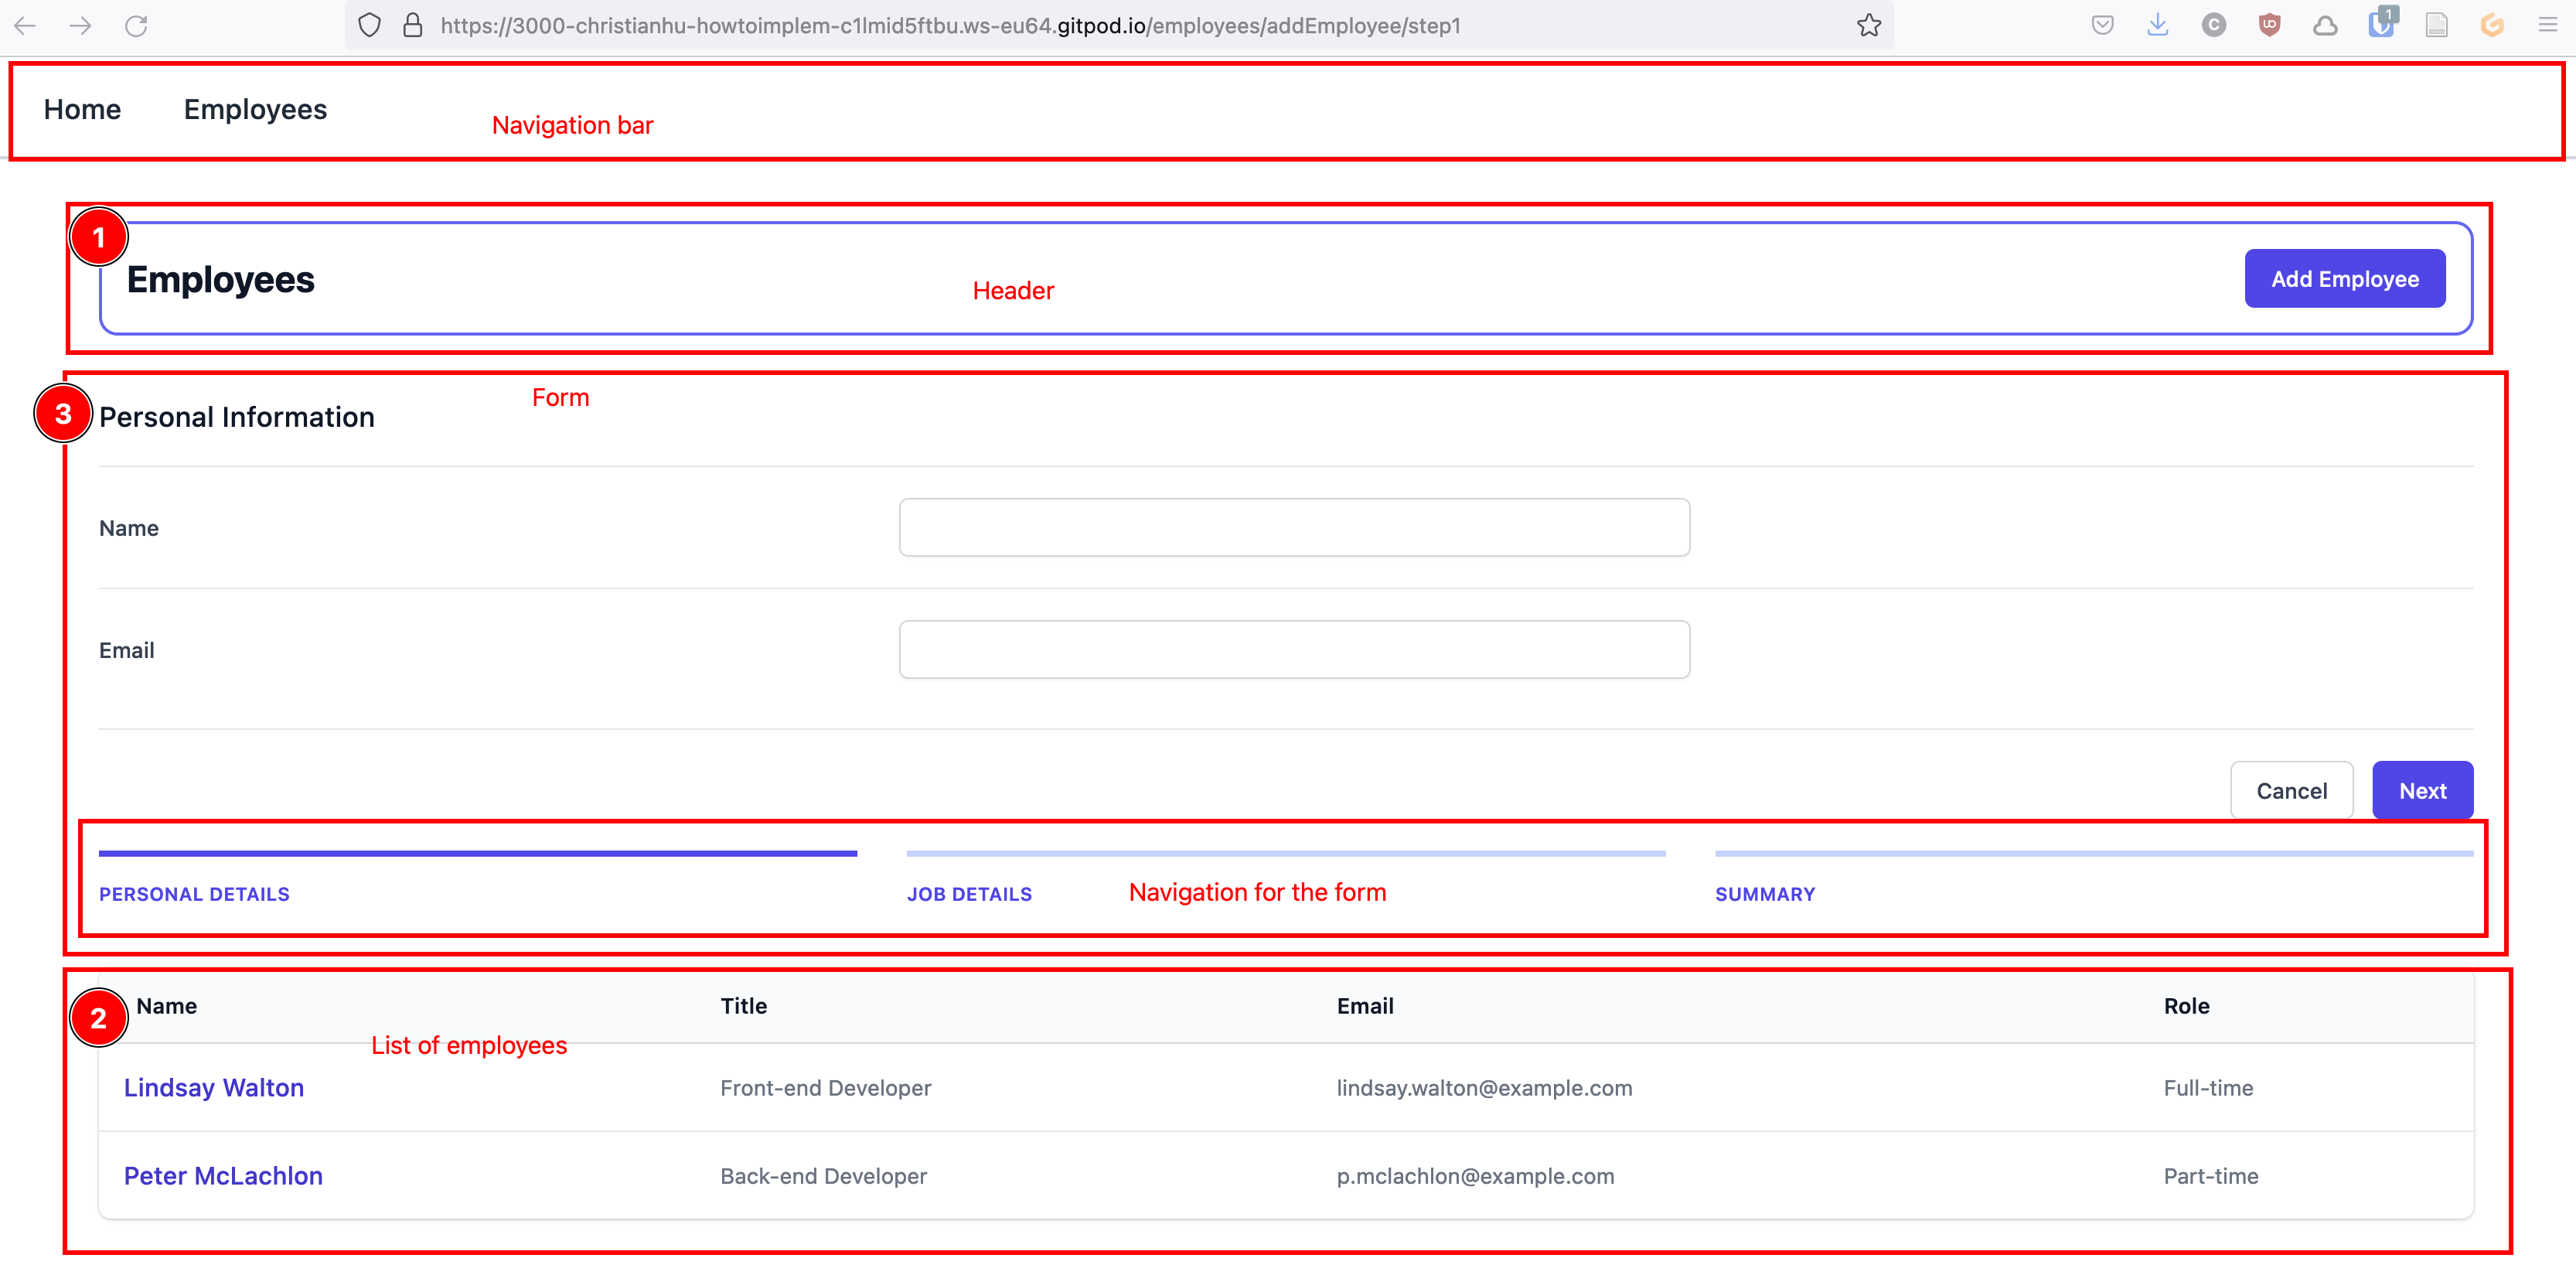
The navigation bar is visible on all pages while the form (3) is rendered between the header (1) and list of employees (2) on the employee overview page.
Setup the routes and embedding the wizard
React Router is not only used for the general routing but also to integrate the wizard.
The general app routing is setup in the index.tsx.
<Routes>
  <Route path="/" element={<App />}>
    {/* All routes on this level will be rendered in the <Outlet /> of the App component */}
    <Route path="/" element={<Home />} />
    <Route path="employees/*" element={<EmployeesOverview />}>
      {/*
       * This route and all routes defined in the children will be rendered in the <Outlet/>
       * of the parent component, here <EmployeeOverview/>
       */}
      <Route path="addEmployee/*" element={<AddEmployeeWizard />} />
    </Route>
    <Route path="employees/:employeeID" element={<EmployeeDetails />} />
    {/* Catch all route if no other route matches */}
    <Route path="*" element={<Error404 />} />
  </Route>
</Routes>
What React Router does is to look at the URL that the user opens and then render all components that match this route. We can nest <Route /> components inside of other <Route /> components. The child routes will be rendered into the <Outlet /> component of the parent route.
The root route (/) matches the App component. It only contains the NavigationBar and an Outlet.
function App() {
  return (
    <>
      <NavigationBar />
      <Outlet />
    </>
  );
}
The Outlet is where all children of the / route will be rendered. We have three children.
- The
Homecomponent which is rendered when the user is on the root route.
Initial page to greet the user. - The
EmployeesOverviewif the user is on/employees.
Shows a list of all employees. - The
EmployeeDetailsif the user is on/employees/[ID_OF_EMPLOYEE].
Shows the details of an individual employee.
The /employees route has additional child routes. Meaning that the components of these children will be rendered in the Outlet of the EmployeesOverview. This is where we will render the wizard.
We want the wizard itself to define the required routes. This is done in the AddEmployeesWizard component.
In it we define the steps we want the wizard to have.
const steps: Step[] = [
  {
    // Name that is displayed in the navigation bar of the wizard
    name: "Personal Details",
    // Route of this step
    to: "/employees/addEmployee/step1",
    // The step component
    element: <Step1 nextStepPath="/employees/addEmployee/step2" />,
  },
  {
    name: "Job Details",
    to: "/employees/addEmployee/step2",
    element: <Step2 nextStepPath="/employees/addEmployee/summary" />,
  },
  {
    name: "Summary",
    to: "/employees/addEmployee/summary",
    element: <StepResult />,
  },
];
This array is then used to create the routes for the individual steps.
<Routes>
  {steps.map((step) => {
    // Extract the last (relative) part of the url of the step.
    const urlParts = step.to.split("/");
    const path = urlParts[urlParts.length - 1];
    // Since the routing is already aware of the full url
    // we must only add the relative part when creating the Route component.
    return <Route key={path} path={path} element={step.element} />;
  })}
</Routes>
The steps
Lets take a closer look at Step1.
In the AddEmployeeWizard the interface defines the properties a step expects to receive.
The step renders two TextInputs and two Buttons. (The text input and button are dedicated components to make them easier to reuse.)
The four components are wrapped in a <form> tag. This is where React Hook Form comes into play.
We use its useForm hook to setup the form.
With it we can add our own submit method.
<form
  className="space-y-8 divide-y divide-gray-200"
  onSubmit={handleSubmit(onSubmit)}
>
And connect the text inputs to the form.
<TextInput
  label="Name"
  {...register("name", {
    onChange: (event) => {
      state.updateName(event.currentTarget.value);
    },
    required: { value: true, message: "Name must be filled" },
  })}
  defaultValue={state.name}
  error={errors.name?.message}
/>
Looking at the registration of the text input there are a few things going on:
- We hook into the
onChangemethod and use it to update our state (more on that later). - We add basic validation that the input must not be empty.
- We provide a default value from the state.
- We pass the error messages from React Hook Form. (The text input contains conditional logic to render the message only if it’s present.)
The last piece to the puzzle is submitting the form.
const onSubmit: SubmitHandler<AddEmployeeWizardInput> = async (data) => {
	// Execute the server side validation
  const validationResult = await validate(data);
  if (!validationResult.isValid && validationResult.errors) {
    mapErrors(validationResult);
  } else if (props.nextStepPath) {
    // Send the user to the next step if the validation succeeded
    navigate(props.nextStepPath);
  }
};
What happens here is that we first execute the server side validation (simulated with the validate function) and based on the result either map the errors to display them to the user, or forward the user to the next step.
What we are not doing is to actually save the data somewhere. Since the onChange method already updates the state, the submitted data is only used for validation.
The onSubmit method is only called if the user uses the Next button to go to the next step. If the user uses the navigation bar to go to another step the method is not called and therefore the input not validated. That is no issue since the last step will validate all data as well.
Step2 is a carbon copy with only different names for the inputs.
Wizard state
We want to enable the user to freely navigate between the individual steps of the wizard without losing any data.
Since each step is a component the data of one step is lost when the user goes to the next step. So solve this issue zustand is used. It is a state management library that is easy to use but comes with everything we need (and more).
Creating the state is easy. The first step is to define what the state stores and how it can be accessed.
interface AddEmployeeWizardState extends AddEmployeeWizardInput {
  updateName: (name: string) => void;
  updateEmail: (email: string) => void;
  updateTitle: (title: string) => void;
  updateRole: (role: string) => void;
  reset: () => void;
}
Since we want the stat to reflect the input of the form it extends the AddEmployeeWizardInput. This ensure all fields of the form are present in the state.
In addition we define four methods, one for updating each field. These are the methods called in the onChange method of the steps.
With this setup we keep track of the data the user enters and can use it to set the defaultValue when setting up an input field.
The reset function clears the state.
Finally we implement the state using the interface.
export const useAddEmployeeWizardState = create<AddEmployeeWizardState>(
  (set) => ({
    ...initialState,
    errors: { ...initialState },
    updateName: (name) => {
      set(() => ({ name: name }));
    },
    updateEmail: (email) => {
      set(() => ({ email: email }));
    },
    updateTitle: (title) => {
      set(() => ({ title: title }));
    },
    updateRole: (role) => {
      set(() => ({ role: role }));
    },
    reset: () => {
      set({ ...initialState });
    },
  }),
);
The final step
The StepResult is the final step of the wizard. It is similar to the other two steps. It shows all input fields but doesn’t allow the user to edit them.
The fields are filled by using the state to provide default values to the form.
const {
  register,
  handleSubmit,
  setError,
  formState: { errors },
} = useForm<AddEmployeeWizardInput>(
  // Initialize using the state
  { defaultValues: { ...state } },
);
It also contains the logic that actually saves the data.
const onSubmit: SubmitHandler<AddEmployeeWizardInput> = async (data) => {
  const validationResult = await validate(data);
  if (!validationResult.isValid && validationResult.errors) {
    mapErrors(validationResult);
  } else {
    addEmployee(data.name, data.title, data.email, data.role);
    state.reset();

    navigate("/employees");
  }
};
If you compare this submit method with the one from the previous steps, the only difference is that the data is send to the server (here simulated using the addEmployee function) and empties the state of the form.
Conclusion
There are a few code duplications (i.e. mapErrors which is implemented in all steps) that probably could be improved.
Other than that I’m happy with the outcome. I struggled a lot to get everything working. You can see the struggle looking at the commit history. I didn’t work on it every day and never longer than 1-2h. So it took me a month to complete.
I feel good enough about it that I’ll use it in any future projects requiring a wizard.
That said, if I missed any major flaws or bugs please feel free to open an issue or get in touch either via mail or Twitter.