Using OpenID Connect (OIDC) to secure your React application
The Goal
In this blog post I’ll demonstrate one way to use Keycloak as a OpenID Connect provider to secure a React frontend.
The code can be found here on GitHub. If you don’t need the details and you are comfortable with React and Keycloak have a look at this provider. It contains all the relevant logic.
If you have any questions or find a mistake feel free to open an issue.
If you want more details on how everything fits together just read along.
What you need
In order to follow along and run the project yourself you’ll need the following tools:
Creating the React project
The first step is to create a new React project. I’ll be using Create React App running the following command:
npx create-react-app webapp --template typescript
The next step is to delete some of the files that we won’t need. Delete the following files:
src/App.csssrc/App.test.tsxsrc/index.css
After deleting this file also remove the import for it inside ofsrc/index.tsx.src/logo.svg
Since I’m not good with CSS I like to use tailwindcss. For this demo project we just pull it in through a CDN.
Inside of public/index.html add the following somewhere inside the head section.
<link href="https://unpkg.com/tailwindcss@^2/dist/tailwind.min.css" rel="stylesheet">
Let’s now create a component which we will use to show some data about the user. Create a folder called components inside the src folder and inside of it create a file called Home.tsx. For now it will only contain some styling and placeholders:
const Home = () => {
  return (
    <section className="text-gray-600 body-font relative">
      <div className="container px-5 py-24 mx-auto">
        <div className="flex flex-col text-center mb-12">
          <h1 className="sm:text-3xl text-2xl font-medium title-font mb-4 text-gray-900">
            Welcome USERNAME
          </h1>
          <p>You are a user</p>
          <p>You are a admin</p>
          <button
            className="text-white bg-red-400 border-0 py-2 px-8 focus:outline-none hover:bg-red-400 rounded text-lg mt-10"
            onClick={() => console.log("Clicked")}
          >
            Logout
          </button>
        </div>
      </div>
    </section>
  );
};

export default Home;
Having created the Home component change the App.tsx file to display it:
import Home from "./components/Home";

function App() {
  return (
    <Home/>
  );
}

export default App;
Setup Keycloak
Preparing the React app is done now. Before starting to implement the authentication logic we need to setup the Keycloak server. We will be using Docker.
The following command will create the Keycloak server and configuring a admin user.
docker run -d -p 8180:8080 --name keycloak -e KEYCLOAK_USER=admin -e KEYCLOAK_PASSWORD=admin -e PROXY_ADDRESS_FORWARING=true jboss/keycloak:14.0.0
It will take a minute or two for the server to start. Open the URL http://localhost:8180 and wait until it is available.
Once Keycloak is available click on “Administration Console” and log in using the user “admin” and the password “admin”.
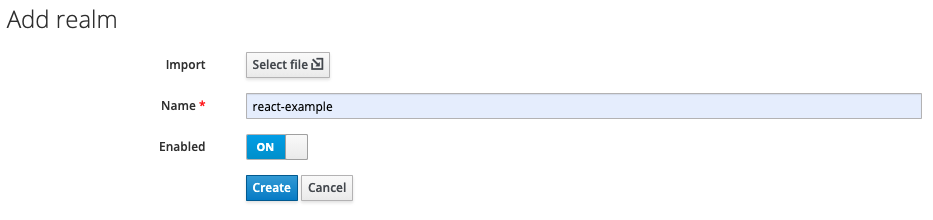
In the upper left corner hover over “Master” and click “Add realm”. Fill in the fields and save:
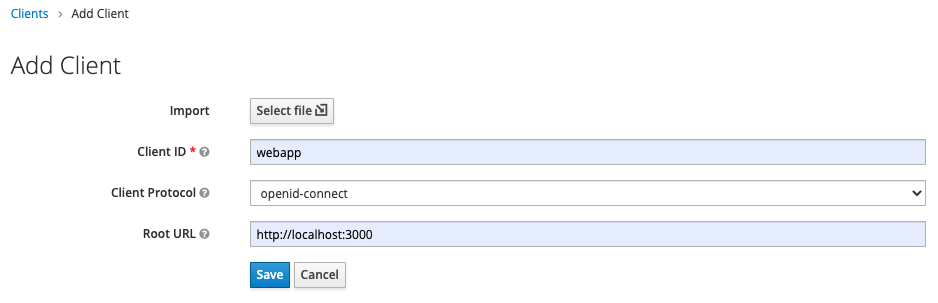
Create a client by navigating to “Clients” in the sidebar and clicking “Create”. Fill in the fields and save:
Keycloak is now ready to handle requests. The only think missing is a user.
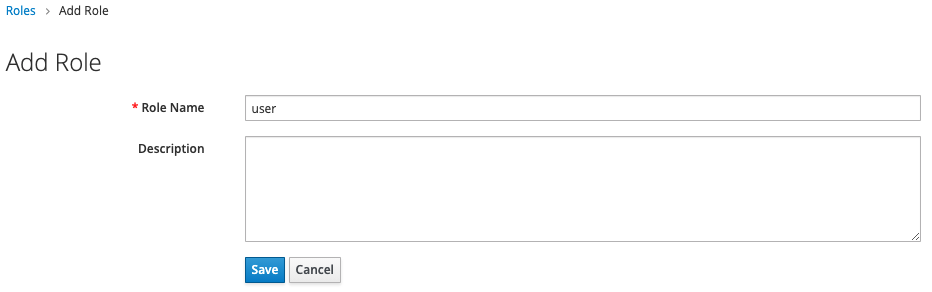
In the sidbar click on “Roles” and choose “Add Role”. Create a role called “user” and one called “admin”.
In the sidbear click on “Users” and choose “Add user”. Create the user:
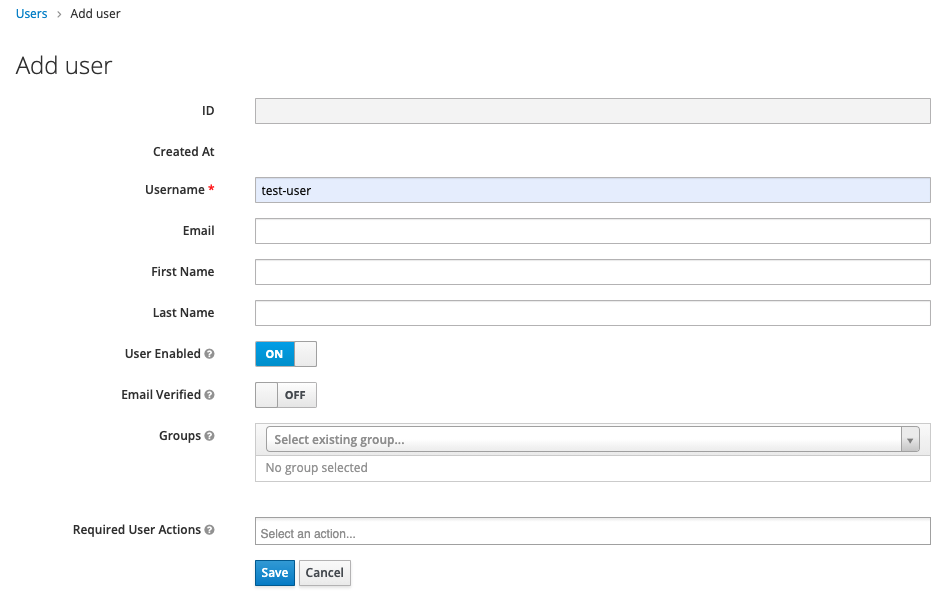
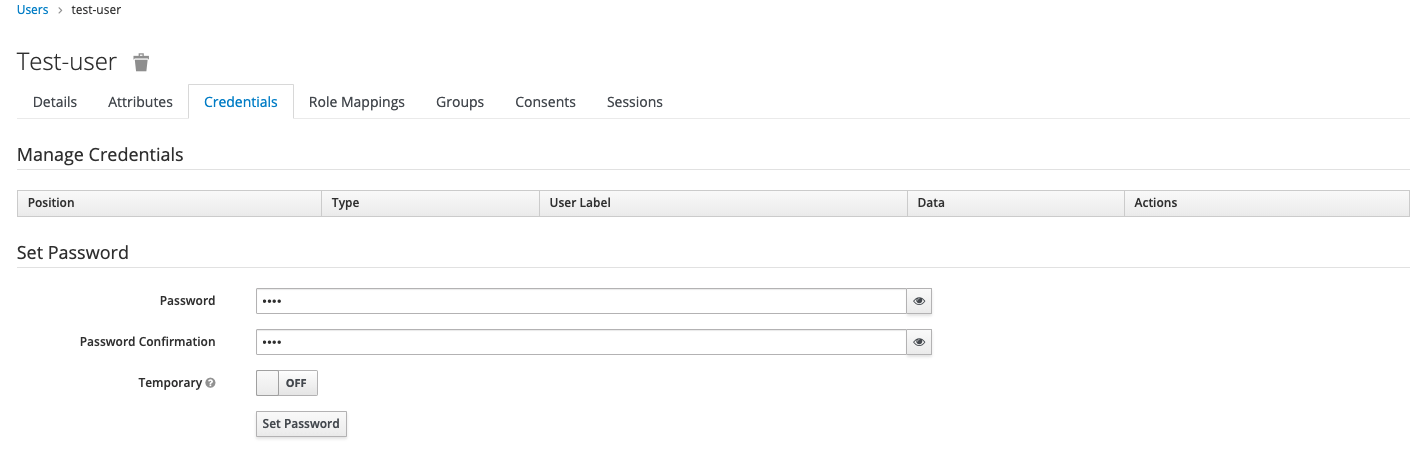
Once saved we have to assign a password. This can be done under the “Credentials” tab:
Adding Authentication to React
Now everything on the Keycloak side is ready and we can write the React implementation. Lets start by showing a loading indicator whenever the app is still in the process of evaluating if a user is authenticated.
Copy LoadingSpinner.tsx and LoadingSpinner.module.css and place them inside the src/components folder. (As mentioned I’m not good with CSS. The spinner has been taken from https://loading.io/css/.)
Add the component to be displayed in App.tsx instead of Home.tsx.
import LoadingSpinner from "./components/LoadingSpinner"

function App() {
  return (
    <LoadingSpinner/>
  );
}

export default App;
Before starting the app add the keycloak-js client which will handle the communication with Keycloak. Make sure to install the same version as the Keycloak server. In our case that is npm i keycloak-js@14.0.0.
Now start the app using npm start. Once started you’ll see the loading indicator.
Now the fun part. We will be using Context to handle the authentication state and make it available throughout the app.
Create a folder and file called src/context/AuthContextProvider.tsx. In it just add what is needed in order to see if it is setup correctly:
import { createContext, useState } from "react";

/**
 * AuthContextValues defines the structure for the default values of the {@link AuthContext}.
 */
interface AuthContextValues {
  isAuthenticated: boolean;
}

/**
 * defaultAuthContextValues defines the default values for the {@link AuthContext}
 */
const defaultAuthContextValues: AuthContextValues = {
  isAuthenticated: false,
};

/**
 * AuthContext is the context exposed by the {@link AuthContextProvider}.
 */
export const AuthContext = createContext<AuthContextValues>(
  defaultAuthContextValues
);

/**
 * The props that must be passed to create the {@link AuthContextProvider}.
 */
interface AuthContextProviderProps {
  /**
   * The elements wrapped by the auth context.
   */
  children: JSX.Element;
}

/**
 * AuthContextProvider is responsible for managing the authentication state of the current user.
 *
 * @param props
 */
const AuthContextProvider = (props: AuthContextProviderProps) => {
  // This is just here to check that we setup the provider correctly.
  console.log("rendering AuthContextProvider");

  // Creating the local state to keep track of the authentication
  const [isAuthenticated, setAuthenticated] = useState<boolean>(false);

  return (
    // Creating the provider and passing the state into it. Whenever the state changes the components using this context will be re-rendered.
    <AuthContext.Provider value={{ isAuthenticated }}>
      {props.children}
    </AuthContext.Provider>
  );
};

export default AuthContextProvider;
To make use of the just created context we need to add it inside the index.tsx file:
import React from "react";
import ReactDOM from "react-dom";
import App from "./App";
import AuthContextProvider from "./context/AuthContextProvider";
import reportWebVitals from "./reportWebVitals";

ReactDOM.render(
  <React.StrictMode>
    <AuthContextProvider>
      <App />
    </AuthContextProvider>
  </React.StrictMode>,
  document.getElementById("root")
);
Restart the app and check the console of your browser. You will see the message rendering AuthContextProvider indicating that the provider is setup correctly.
Before hooking it up to Keycloak lets make sure its basic functionality works. The AuthContext has the field isAuthenticated. Currently it is always false but we can already setup our app to behave differently based on whether it is false or true.
This logic will be inside the App.tsx component. If isAuthenticated is false we want to show the loading spinner. If it is true we want to show the Home.tsx component.
For this we just need to get the AuthContext and then based on the value of isAuthenticated return different components:
function App() {
  const authContext = useContext(AuthContext);

  // Show the loading spinner while the user is not authenticated
  if (!authContext.isAuthenticated) {
    return <LoadingSpinner />;
  }
  // If the user is authenticated display the home component
  else {
    return <Home />;
  }
}
When you open the app nothing has changed. Only the loading spinner is shown.
Change the value for to true and reload the page.
const [isAuthenticated, setAuthenticated] = useState<boolean>(true);
You’ll now see the Home.tsx component. For know it only contains placeholders but we are about to change that. Set the value back to false.
The next step is to setup the Keycloak client. Extend the AuthContextProvider.tsx to look like this:
import Keycloak, { KeycloakConfig, KeycloakInitOptions } from "keycloak-js";
import { createContext, useEffect, useState } from "react";

/**
 * KeycloakConfig configures the connection to the Keycloak server.
 */
const keycloakConfig: KeycloakConfig = {
  realm: "react-example",
  clientId: "webapp",
  url: "http://localhost:8180/auth",
};

/**
 * KeycloakInitOptions configures the Keycloak client.
 */
const keycloakInitOptions: KeycloakInitOptions = {
  // Configure that Keycloak will check if a user is already authenticated (when opening the app or reloading the page). If not authenticated the user will be send to the login form. If already authenticated the webapp will open.
  onLoad: "login-required",
};

// Create the Keycloak client instance
const keycloak = Keycloak(keycloakConfig);

/**
 * AuthContextValues defines the structure for the default values of the {@link AuthContext}.
 */
interface AuthContextValues {
  /**
   * Whether or not a user is currently authenticated
   */
  isAuthenticated: boolean;
}

/**
 * Default values for the {@link AuthContext}
 */
const defaultAuthContextValues: AuthContextValues = {
  isAuthenticated: false,
};

/**
 * Create the AuthContext using the default values.
 */
export const AuthContext = createContext<AuthContextValues>(
  defaultAuthContextValues
);

/**
 * The props that must be passed to create the {@link AuthContextProvider}.
 */
interface AuthContextProviderProps {
  /**
   * The elements wrapped by the auth context.
   */
  children: JSX.Element;
}

/**
 * AuthContextProvider is responsible for managing the authentication state of the current user.
 *
 * @param props
 */
const AuthContextProvider = (props: AuthContextProviderProps) => {
  console.log("rendering AuthContextProvider");

  // Create the local state in which we will keep track if a user is authenticated
  const [isAuthenticated, setAuthenticated] = useState<boolean>(false);

  useEffect(() => {
    /**
     * Initialize the Keycloak instance
     */
    async function initializeKeycloak() {
      console.log("initialize Keycloak");
      try {
        const isAuthenticatedResponse = await keycloak.init(
          keycloakInitOptions
        );

        if (!isAuthenticatedResponse) {
          console.log(
            "user is not yet authenticated. forwarding user to login."
          );
          keycloak.login();
        }
        console.log("user already authenticated");
        setAuthenticated(isAuthenticatedResponse);
      } catch {
        console.log("error initializing Keycloak");
        setAuthenticated(false);
      }
    }

    initializeKeycloak();
  }, []);

  return (
    <AuthContext.Provider value={{ isAuthenticated }}>
      {props.children}
    </AuthContext.Provider>
  );
};

export default AuthContextProvider;
The import parts are setting up the configuration of the Keycloak client and creating an instance of it:
/**
 * KeycloakConfig configures the connection to the Keycloak server.
 */
const keycloakConfig: KeycloakConfig = {
  realm: "react-example",
  clientId: "webapp",
  url: "http://localhost:8180/auth",
};

/**
 * KeycloakInitOptions configures the Keycloak client.
 */
const keycloakInitOptions: KeycloakInitOptions = {
  // Configure that Keycloak will check if a user is already authenticated (when opening the app or reloading the page). If not authenticated the user will be send to the login form. If already authenticated the webapp will open.
  onLoad: "login-required",
};

// Create the Keycloak client instance
const keycloak = Keycloak(keycloakConfig);
With that done we can make use of the React hook useEffect() to initialize the connection. The hook has no dependency meaning that it is only executed when the application is opened or reloaded.
Since we configured Keycloak to require the user to log in it will check if the user is already authenticated. If so the state isAuthenticated is set to true. If not the user is send to the Keycloak login form. While all of this happens the user will see the loading spinner.
useEffect(() => {
  /**
   * Initialize the Keycloak instance
   */
  async function initializeKeycloak() {
    console.log("initialize Keycloak");
    try {
      const isAuthenticatedResponse = await keycloak.init(
        keycloakInitOptions
      );

      if (!isAuthenticatedResponse) {
        console.log(
          "user is not yet authenticated. forwarding user to login."
        );
        keycloak.login();
      }
      console.log("user already authenticated");
      setAuthenticated(isAuthenticatedResponse);
    } catch {
      console.log("error initializing Keycloak");
      setAuthenticated(false);
    }
  }

  initializeKeycloak();
}, []);
With this done the authentication part of the app works. When you now open the app you will be fordwarded to Keycloak in order to authenticate.
Log in with the user created earlier and you’ll see the Home component.
The last step is to load the user profile (for the username), check the roles and wire up the logout button.
Add the logout logic
Lets start with the logout button to make further testing easier. The Keycloak client has a logout method. So we only need to make it available through the context.
//...This is outside of AuthContextProvider
interface AuthContextValues {
  /**
   * Whether or not a user is currently authenticated
   */
  isAuthenticated: boolean;
  /**
   * Function to initiate the logout
   */
  logout: () => void;
}
//...This is outside of AuthContextProvider
const defaultAuthContextValues: AuthContextValues = {
  isAuthenticated: false,
  logout: () => {},
};
//...This belongs inside of AuthContextProvider
  const logout = () => {
    keycloak.logout();
  };

  return (
    <AuthContext.Provider value={{ isAuthenticated, logout }}>
      {props.children}
    </AuthContext.Provider>
  );
...
Now add the AuthContext to the Home component and call the logout() function when the button is clicked.
Import the required dependencies and use the useContext hook to get the AuthContext:
import { useContext } from "react";
import { AuthContext } from "../context/AuthContextProvider";

const Home = () => {
  const authContext = useContext(AuthContext);
...
On the button update the onClick parameter to use the logout() method exposed by the context:
<button
  className="text-white bg-red-400 border-0 py-2 px-8 focus:outline-none hover:bg-red-400 rounded text-lg mt-10"
  onClick={authContext.logout}
  >
    Logout
</button>
The logout button now works. Once you click it you will be back on the Keycloak login form.
Display the username
To display the username we need to load the profile from Keycloak. This is a separate request. We start by extending the AuthContextProvider to expose and keep track of the username:
//...This is outside of AuthContextProvider
interface AuthContextValues {
  /**
   * Whether or not a user is currently authenticated
   */
  isAuthenticated: boolean;
  /**
   * Function to initiate the logout
   */
  logout: () => void;
  /**
   * The name of the authenticated user
   */
   username: string;
}
//...This is outside of AuthContextProvider
const defaultAuthContextValues: AuthContextValues = {
  isAuthenticated: false,
  logout: () => {},
  username: "",
};
//...This is inside of AuthContextProvider
// Local state that will contain the username once it is loaded
  const [username, setUsername] = useState<string>("");
//...This is inside of AuthContextProvider
  return (
    <AuthContext.Provider value={{ isAuthenticated, logout, username }}>
      {props.children}
    </AuthContext.Provider>
  );
We add another useEffect() hook to load the profile. We will do this whenever isAuthenticated is true:
useEffect(() => {
  /**
   * Load the profile for of the user from Keycloak
   */
  async function loadProfile() {
    try {
      const profile = await keycloak.loadUserProfile();
      if (profile.firstName) {
        setUsername(profile.firstName);
      } else if (profile.username) {
        setUsername(profile.username);
      }
    } catch {
      console.log("error trying to load the user profile");
    }
  }

  // Only load the profile if a user is authenticated
  if (isAuthenticated) {
    loadProfile();
  }
}, [isAuthenticated])
This will load the user profile and expose the username through the context. In the Home.tsx the only thing that needs to be done is replace the placeholer for the username:
//...
<h1 className="sm:text-3xl text-2xl font-medium title-font mb-4 text-gray-900">
  Welcome {authContext.username}
</h1>
//...
Now the app will show the username.
The only think missing is to check what roles a user has and only display the appropriate content in the Home component.
Checking user roles
We start again by extending the AuthContextProvider to expose a method that can be used to check if a user has a specific role. This is another method already included with the Keycloak client. So like the logout() method we only have to expose it through the context:
//...This is outside of AuthContextProvider
interface AuthContextValues {
  /**
   * Whether or not a user is currently authenticated
   */
  isAuthenticated: boolean;
  /**
   * Function to initiate the logout
   */
  logout: () => void;
  /**
   * The name of the authenticated user
   */
  username: string;
  /**
   * Check if the user has the given role
   */
  hasRole: (role: string) => boolean;
//...This is outside of AuthContextProvider
const defaultAuthContextValues: AuthContextValues = {
  isAuthenticated: false,
  logout: () => {},
  username: "",
  hasRole: (role) => false,
};
//...This is inside of AuthContextProvider
  const hasRole = (role: string) => {
    return keycloak.hasRealmRole(role);
  };

  return (
    <AuthContext.Provider
      value={{ isAuthenticated, username, logout, hasRole }}
    >
      {props.children}
    </AuthContext.Provider>
  );
}
Now the Home.tsx component can be extended to only show certain content if the user has the required role:
//...
{authContext.hasRole("user") && <p>You are a user</p>}
{authContext.hasRole("admin") && <p>You are a admin</p>
//..
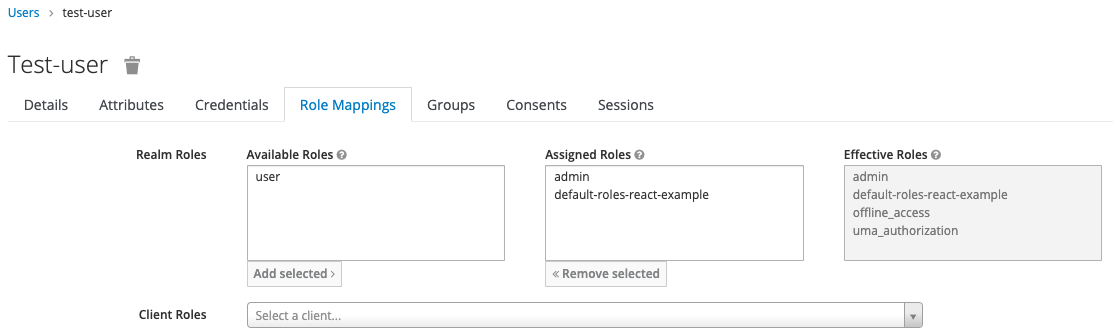
When you now open the app you’ll only see the content for which the user has the role. You can test this by changing which roles are assigned to a user.
That’s it. You now have a React app that is secured using OpenID Connect! If you have any questions or remarks open a GitHub issue, send me a mail or DM me on Twitter.
Next Steps
The logical next step would be to use the access token from authenticating with Keycloak to also authenticate when making requests to a server. For this the request must include the Authentication header with a Bearer token. I’m mostly using axios which offers interceptors. These can be used to add the Bearer token to all outgoing request. We can add this in the useEffect() hook in which we also initialize Keycloak.
axios.interceptors.request.use((config) => {
  config.headers["Authorization"] = `Bearer ${keycloak.token}`;
  return config;
});
Now all you have to do on the server side is to validate the token.
Of course it could be that the token is expired and the backend responds with a http 401 code. For this case you could setup another interceptor that tries to refresh the token and repeats the request. If refreshing the request fails the user will be logged out automatically.
// Deal with all responses containing a 401 error to try to refresh the access token if possible
axios.interceptors.response.use(
  // No special handling of responses needed. We return it as it comes in.
  (response) => {
    return response;
  },
  // This object is not null if an error occurred
  async (error) => {
    if (error.response === undefined) {
      throw error;
    }
    // Check if it is a 401 Unauthorized error
    if (error.response.status === 401) {
      try {
        // Try to refresh the access token
        const result = await keycloak.updateToken(5);
        // Was refreshing the access token successfull?
        if (result === true) {
          // Repeat the request
          return await axios({ ...error.config });
        } else {
          // If the access token could not be refreshed we reject the promise and the code responsible for the request has to handle it.
          throw new Error("Unauthorized");
        }
      } catch (error) {
        keycloak.logout();
        throw error;
      }
    }
    // No special treatment of any other error
    throw error;
  },
);
Resources
The following resources helped me creating this post.